To create an Archive file
...
Introduction
Outlook doesn't automatically archive email but once set up it will automatically move messages into a pst file. These pst files can also be used to extract all data (calendar, email, contacts) from a mailbox to be imported into another one.
PST files are not recommended for permanent storage for old email as they are easily lost if they are on a computer's hard drive and Microsoft do not support (or recommend) that they be stored on a network drive and accessed from there.
Archive or backup/export all contents of a mailbox
Please follow this guide if you need to backup or export all the content of your mailbox: https://support.microsoft.com/en-us/office/back-up-your-email-e5845b0b-1aeb-424f-924c-aa1c33b18833
To add an existing Archive file to Outlook
If you have a pst file that you want Outlook to link to, do the following.
- Open up Outlook
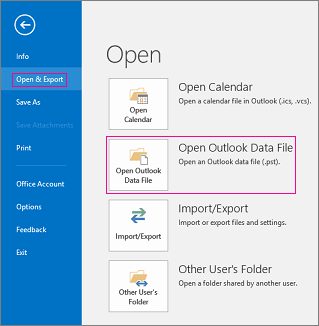
- Choose the File tab
- Choose Open and Export and click Open Outlook Data File
- Find the pst file, select it and click Open
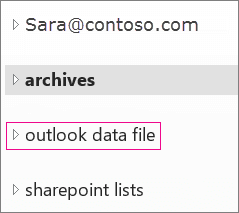
- Your PST will now appear in the left-nav bar in Outlook
- You can rename this file from Archive or Outlook data file by right clicking on it and selecting Data File Properties or Properties
- Click on the Advanced button and in the Name field you can change the folder name. Type in the text that you want to see in the left navigation area of Outlook
- Click OK and you should now see the appropriately named folder.
To create an automatic archive (not recommended)
By default Outlook does not have an Archive file, one has to be created manually. Once the file has been created, you'll need to check the AutoArchive settings to see if the default settings meet your needs.
- Open Outlook.
- Select: File > Info Tools > Cleanup Tools ( Mailbox Cleanup).Click on Archive in the dropdown box.
- In the window that opens you can change the settings to Archive:
- Select the folder you want to archive
- If you choose 'Archive all folders according to their AutoArchive settings' all the items in your mailbox will be archived based on the other options you choose below
- If you choose 'Archive this folder and all subfolders' you will only get the folder that you have highlighted. In the screenshot below the inbox folder would be archived.
- Select the folder(s) you want to archive.
- Select a date if you want the archive to only pick up items older than a certain date
- in the Archive file box, browse to your U:\My Documents\Outlook Files or whatever folder you want the archive to be in. Note: we suggest that it be on a network drive so that it gets backed up.
- Select the folder you want to archive
- Click OK and the Archive file will be created and attached to Outlook.
- The Archive process will then run using the settings you previously entered. All email received before the date you selected will be moved to the Archive file. If the email being Archived is in a folder named John Doe, it will be stored in a folder named John Doe in the Archive file. If a folder does not have email old enough to be Archived, the folder will not be created in the Archive file until it does.
Note: To see if the Archive process is running, look at the lower right-hand corner of the Outlook screen.
7. You should now see an Archive folder in your list of mailboxes
To add an existing Archive file to Outlook
If you have a pst file that you want Outlook to link to, do the following. Please note that this will not work if you are using Outlook via Citrix (Mints@Home)
...


