Troubleshooting FAQ and Updating OneDrive for Business
OneDrive is not syncing my files
OneDrive was working, but now it is not syncing my files, and the icon is missing from system tray
- Read the appropriate guides: https://support.office.com/en-gb/article/OneDrive-Help-5943c2b9-fafc-4cb4-95c0-9cc73fcabb30?ui=en-US&rs=en-GB&ad=GB
- Try running the Microsoft Troubleshooter: http://windows.microsoft.com/en-gb/windows-10/run-the-onedrive-troubleshooter
- Try running the reinstalling OneDrive
- For Windows 7 or 8 - download the client from: https://onedrive.live.com/about/en-us/download/ (note - this is worth trying on Windows 10 also)
- For Windows 8.1 or 10, use the cached copy on your computer. Open a Run prompt by pressing Windows + R, then paste: %localappdata%\Microsoft\OneDrive\Update. Run the installer in the folder.
- If there is no cached installer in your appdata, then use the link for Windows 7 above
- Try resetting OneDrive:
If OneDrive sync seems to be stuck for a long time and nothing else is working, try a reset. Be aware that resetting OneDrive re-syncs all your OneDrive files, which could take some time depending on how many files you’re syncing.
Press the Windows key + R.
In the Run window, enter: %localappdata%\Microsoft\OneDrive\onedrive.exe /reset
Click OK.
Make sure the OneDrive icon in the notification area of the taskbar disappears and then re-appears after a minute or two. Here’s how to check: Right-click the blue OneDrive cloud icon in the notification area, at the far right of the taskbar.

(You might need to click the Show hidden icons arrow next to the notification area to see the OneDrive icon.)
If the OneDrive icon doesn’t re-appear after a few minutes, open the Run window again and enter: %localappdata%\Microsoft\OneDrive\onedrive.exe
If OneDrive isn't running, and when I try to start it I get an error like this, or you need to force a version update:

Unfortunately, OneDrive can sometimes... just vanish. So far the only effective repair is to reinstall the client - even if you are using Windows 10 (which is meant to include it).
The official link to download the latest fully released production version (for Windows) is https://go.microsoft.com/fwlink/p/?linkid=844652. This works on Windows 10.
Changelog for OneDrive: https://support.office.com/en-us/article/New-OneDrive-sync-client-release-notes-845dcf18-f921-435e-bf28-4e24b95e5fc0?ui=en-US&rs=en-US&ad=US
Am I running the OneDrive personal, OneDrive for Business, or OneDrive for Business Next Gen Sync Client?
Confusingly, there are three different versions of the OneDrive sync client. The simplest way to tell which OneDrive sync clients you have is to open your Windows File Explorer and look in the folder navigation pane on the left. You might see up to three OneDrive sync clients in the folder list.
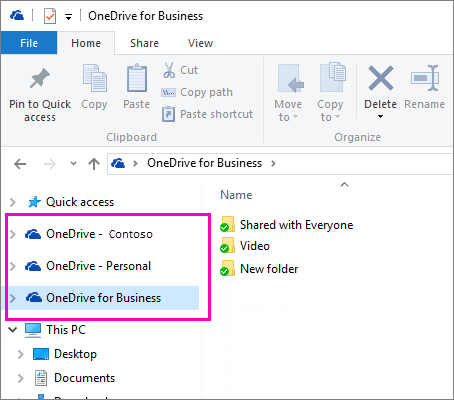
If you see OneDrive - Personal - you have the sync client for your personal OneDrive service (based on onedrive.exe).
If you see OneDrive - <yourcompany> - you have the OneDrive for Business Next Generation Sync Client (based on onedrive.exe).
If you see OneDrive for Business - you have the existing OneDrive for Business sync client (based on groove.exe).
How to move documents to a new OneDrive Account
Introduction
Some people have access to two OneDrive accounts; one for the Clinical School and one for an @cam account. The Clinical School account currently allows storage capacity of 1 terabyte.
Our recommendation is that you move your data into the @cam account and these instructions will guide you through the process. The storage capacity of the UIS account is 5 terabytes.
Requirements
- A computer (Windows, Linux or Mac)
- 2 OneDrive accounts; medschl/SLCU and @cam
- Enough space on your computer to accommodate the size of files you wish to move. This is to allow you to temporarily download them before uploading them elsewhere. If you do not have the required space to download them please contact the CSCS service desk.
- Applicable only if completing this from home; Internet download capacity sufficient to download any large files. If you have large files to move and are looking to do this from home we suggest instead that you come into the office to complete this.
Instructions
This method requires that you have enough local storage space on your computer to download all of the files in your old OneDrive account.
- Navigate to onedrive.live.com in your web browser and click Sign In in the upper right.
- When prompted, enter your email address for the clinical school account you are moving your data out of: crsid@medschl.cam.ac.uk or first.last@slcu.cam.ac.uk Click Next, choose Work or school account and enter your Mints or SLCU password.

- Select My Files on the left side of the screen, and select all files and folders in the OneDrive web interface by ticking to select each folder or file. The keyboard shortcut to select all files at once is to press command + a (Mac OS) or control + a (Windows) on the keyboard.

- Click the Download button in the toolbar to the right of your name.

- Select the Save File radio button and click OK and wait for the download to finish. Be aware that for large files, completing this over the internet from home may take a considerable amount of time. In these cases it is recommended that you check your internet download speed first, consider the time of day you complete this, perhaps to complete the task when download speeds are higher and if still in doubt, come into the office to complete this.

- Once the download has finished, use Windows Explorer or Mac Finder to locate your downloads and double click the downloaded .zip file to open it and extract all the files to a new folder of your choice. We recommend that you do not save large files to a network drive as this may take a considerable amount of time. Also be aware of the storage capacity available to you on your computer.
- Sign out of the OneDrive web interface by clicking your name in the upper right and clicking Sign Out.

- Sign in to your @cam account in the browser window you have open to OneDrive
- Click on My files in the left side of the page
- in the toolbar at the top, click Upload

- Choose Files
- Navigate to where you saved your unzipped files and select them all. You can press command + a (Mac OS) or control + a (Windows) on the keyboard to choose them all at once and click Open.
- All of your files will be uploaded into your @cam OneDrive account
- Once you are satisfied that they have all been moved, delete them from your medschl/SLCU account by following steps 1-3 above. Select all of the files and click Delete from the toolbar at the top.

I deleted a file by accident how do I recover it?
ntroduction
This guide explains the steps you can take to restore a file previously saved to OneDrive for Business
Online Resources
Instructions here are taken from: https://support.office.com/en-gb/article/Find-lost-or-missing-files-in-OneDrive-0d929e0d-8682-4295-982b-4bd75a3daa01
Instructions
Restoring Files from your Local Computer (If you are using OneDrive Sync Client)
If you deleted the files from your local computer, then they should be in your local Recycle Bin, and can be restored as normal!
Restoring Files from OneDrive Online Recycle Bin
You might need to restore from your online recycle bin if:
- You have saved a file directly to OneDrive for Business
- You have emptied your local recycle bin
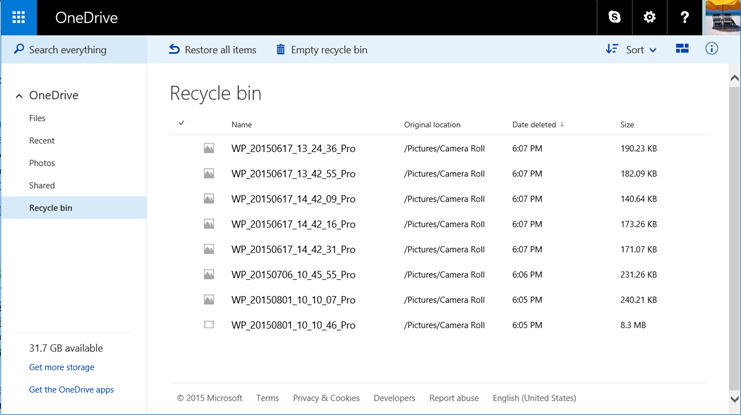
Check the OneDrive Online Recycle bin
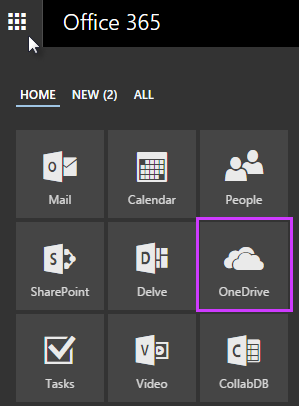
- Login to https://portal.office.com/Home
- Click on OneDrive
- Click on Recycle Bin
- Either select files and folders that you wish to restore (you can select multiple entries) - OR - click Restore all items
- Click Restore
Important Notes about Restoring Files:
- If you delete a folder that contains other folders, all folders will be presented separately in the OneDrive Recycle Bin. Restoring the top level folder will only restore it and the files it contained. You must restore all other folders individually.
Remember that when you delete a file in OneDrive from one device, it deletes it from your OneDrive everywhere. And if you move a file from OneDrive to a different location on a device, it removes it from your OneDrive.
OneDrive automatically empties files from the recycle bin if they've been there for 30 days. If you want to keep a file that's in your recycle bin, make sure to restore it within 30 days. For more info about restoring files, see Delete or restore files and folders.
If you shared a folder with other people and you no longer want them to be able to delete items from the folder, you can change the permissions for the folder. For more info, see Share files and folders and change permissions.
What to do if you can't find your files
Search for the missing files or folders
You might have saved the files to a location you didn't intend to, or moved the files by mistake. Go to the OneDrive website and use the Search everything box in the upper-left corner.
Tip: Search in OneDrive not only searches the names of files, it also searches the contents of the files, including text in documents, as well as file metadata, photo tags and even text shown in photos.
If you're syncing files, open File Explorer on your PC and browse to your OneDrive folder. Use the search box in the upper right to search for the missing files or folders
Check the device you used to upload the files or folders
There might have been a problem uploading the items, or the device might have lost its Internet connection before the items were done uploading.
Note: Keep in mind that it takes time for files to upload and download. Make sure your files have finished uploading before checking other devices for the files. To learn what you can do to help files sync as quickly as possible, see Maximize upload and download speed.
If shared items no longer appear, check with the owner of the items
If someone stops sharing files or folders with you, they'll be removed from your Shared list. If you want to access the items, ask the owner to share them with you again.
How do I restore a previous version of a file?
Introduction
Whenever a new copy of a file is saved / synced to OneDrive for Business, it keeps the previous version to maintain a Version History. This guide explains how to use this feature.
Requirements
- OneDrive configured as per Syncing Files via OneDrive Client
- You must have previously synced your files successfully
- Internet access is needed to download previous versions
Instructions
These instructions are copied and edited from: https://support.office.com/en-gb/article/Restore-a-previous-version-of-a-document-in-OneDrive-for-Business-159cad6d-d76e-4981-88ef-de6e96c93893
Browse to the file online: You can do this either by
In Windows, right click the file and choose View Online:
In a browser, signing into https://portal.office.com/ and opening your OneDrive for Business:
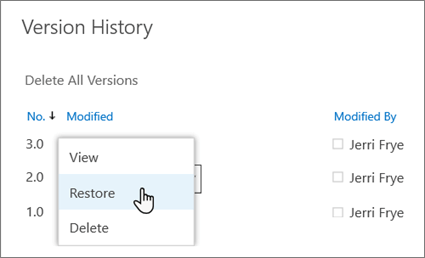
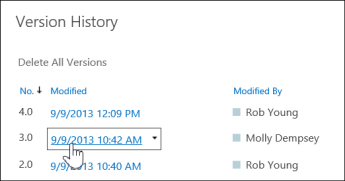
Right-click the document for which you want to restore an earlier version, and then click Version History.
In the Version History dialog box, select the arrow next to the version of the document that you want to restore, and then click Restore.
In the confirmation message, click OK.
The document version you selected becomes the current version. The previous current version becomes the previous version in the list.

View a previous version of a document
Sometimes you may just want to view an earlier document version. Or you may want to see and compare an earlier document version before you restore it as the current version.
Right-click the document for which you want to restore an earlier version, and then click Version History.
In the Version History dialog box, select the link for the document version you want to view.
The document opens in its application. Depending the type of document, you may see options for comparing document versions.