You are viewing an old version of this content. View the current version.
Compare with Current
View Version History
« Previous
Version 17
Next »
Introduction
This guide shows you how to create a new Outlook profile for managing your new Exchange Online account in Microsoft Outlook 2019, Outlook 2021 and Outlook 365.
Creating a new Outlook profile can help in resolving certain errors that may occur once your mailbox has been migrated by CSCS & UIS.
Please ensure you are running either Outlook 2019 or Outlook 2021 or Outlook 365 before attempting this process.
If your version of Outlook is 2016 or older or you aren’t sure what version you are running, please follow our guide for upgrading it before attempting these steps.
Requirements
Instructions:
You can have multiple Outlook profiles on a computer each pointing to different email accounts and with different settings. This can be useful if you need to document settings from your Medschl mailbox to recreate in Exchange Online. It is also helpful if you manage different mailboxes, or need to do an email merge from Word to a shared mailbox. Below are 2 methods to create a new profile (automatic and manual) plus information on how to set your computer up to allow you to choose which profile you are logging in to.
Automatic Method
If you have a CSCS-supported Windows computer you should be able to use this method
Close Outlook
Go to the CSCS Software Portal at https://software.medschl.cam.ac.uk
Log in with your medschl/Mints username and password
Select Downloads in the left navigation bar
Type Profile in the Search bar near the top of the Downloads window and hit the enter key on your keyboard. A single result should appear

Click on the name of the item and then the Install button on the bottom of the window
A small window will pop up

Click OK
It will take a few minutes for a script to run to create your new profile. You can check the status on the Download History item in the left navigation bar. It will show a status of Success when the installation is completed.

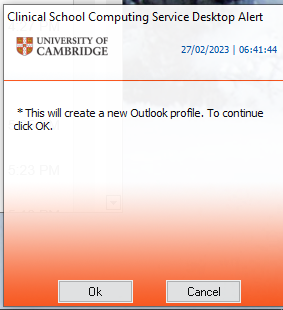
Launch Outlook and this window will appear

Click OK and a window will appear indicating that it is searching for accounts
It will take a few minutes and then will enter an email address in the appropriate box. Click Connect and it will create a new profile for you and will go into your Exchange Online mailbox. If you haven’t been migrated yet this will not work unless you change the email address to <crsid>@cam.ac.uk (and not medschl.cam.ac.uk).
Manual Method
Ensure Outlook is closed
Click on the Windows Start Button (at the bottom left of your screen) to open the Start Menu. With the Start Menu open, type outlook.exe /manageprofiles (note the space before the slash!) and hit the Enter key.

If you receive an error like the image below please instead type outlook.exe /profiles and press enter, which should take you straight to step 6 below.

If a User Account Control prompt appears, click Yes:

A window will appear with 3 options, click
Show Profiles

Another dialogue box called Mail should appear. Click Add...

Choose a new name for your new profile and click OK.

The Add Account wizard will now appear. Type in:
your email address (in the format: CRSid@http://cam.ac.uk )
your Raven password
click Next, then Finish

8. Back at the Mail dialogue, click Always use this profile, select your new profile from the drop-down menu, and click OK.

9. Go back to the Start Menu and open Outlook. Your new profile is now loaded and your Exchange Online account is now added in the left sidebar (NB: This will show up as crsid@<mail domain>.cam.ac.uk eg abc123@medschl.cam.ac.uk)
10. Wait for your mailbox folders to sync. Outlook is now set up, and you can begin adding customisations to your new profile (such as your email signature).
Configure Multiple Outlook profile chooser
You can have more than one Outlook profile set up on your computer and switch between them. This may be useful if you have settings that you wish to duplicate into Exchange Online. Unfortunately you can only run one profile at a time. Here is how to set it up:
This must
Ch
be done after creating a new profile
Close Outlook
In the search bar in the taskbar of your computer type Control Panel and hit the enter key on your keyboard
the Control Panel window will appear. Type Mail in the ‘Search Control Panel’ area

And click on the Mail application that is displayed
A window will pop up

Click on Show Profiles
A window will pop up showing you all of your email profiles

There are two settings you can choose on this screen:
Prompt for a profile to be used - every time you launch Outlook you will be prompted to choose which profile you want to use, allowing you to switch profiles by re-launching Outlook.
Always use this profile - if you have several profiles and want one to be the one that is automatically launched when you go into Outlook, choose this option and select the profile you wish to use. you will not be able to easily switch between profiles if you configure this option


