Channels in MS Teams
Channels are a big part of Teams and assist with building conversation and collaboration around a topic, such as projects or core team functions like research, admin, finance etc
You can create a new new channel for your team by clicking on the three dots / ellipsis symbol (1) to open up a menu and then selecting Add channel (2):
You will then need to enter the following details for your channel:
Channel Name (add a name)
It is suggested that Team owners create two channels initially: An Urgent channel (named 1-Urgent) for priority discussion items and a General channel (2-General) to discuss general topics related to the team's purpose. You will also have the ability to create new channels in your team. (see creating channels instruction)
When creating new channels, we suggest adding an alpha-numeric naming convention (e.g. 5-Project_XX) to give you channels a more defined structure / hierarchy. e.g:
Description (optional help for other on what the channel should be used for)
Privacy (select whether this is open to the Team or only certain members)
We suggest that channels are setup as open by default.
Once the new channels have been added, your channels will be visible as follows:
Tabs
The purpose of tabs is to put frequently accessed information front and centre within Teams for easy access by all team members.
Tabs are best used in a Teams channel to provide structure to collaboration centring around Office 365 tools. Many of these tools will already be familiar to you, for example Excel, Powerpoint and OneNote. This allows tabs to fulfil a variety of uses or functions, depending on your needs. Each channel includes three tabs by default - Posts, Files and Notes:
To help you get started, we'd suggest setting up the following tabs for your channels
- Files (key documents - this should be added by default)
- Notes (using OneNote - added by default)
- Planning (using MS Planner)
- Data (using Excel)
Files
This is essentially a shared document library ,which displays all your Team's files, (that will be stored in your Sharepoint team site).
Excel, PowerPoint, Word, and PDF files must be uploaded to the Files tab before they can be converted to other tabs. Any existing uploaded file can be converted to a tab with a single click
Once a file is added, you can immediately start working on it with your team members. So if add a document to a tab, this will be visible to all team members who can then edit, review, annotate the document.
If you are signed in to Office 2016 or Office 2019 with your @cam.ac.uk account you will also see any recently edited files from channels appear in your "Recent Files" list - you can open, edit and save them back to the Teams Files section from within the office application. The path for them will appear as "Team_Name >> Shared Documents >> Channel_Name" or "University of Cambridge >> site >> Team_Name:
Notes
This tab should be setup to use OneNote, which is a note taking application.
Team members can create notes that can include text, tables, pictures, and drawings. Unlike a word processor, OneNote features a virtually unbounded document window, in which users can click anywhere with the notes page to create a new text box at that location. OneNote saves data automatically as the user makes edits to their file.
Guidance on using OneNote in Teams: https://support.office.com/en-us/article/Add-a-OneNote-notebook-to-Teams-0ec78cc3-ba3b-4279-a88e-aa40af9865c2
Planning
Microsoft Planner is a to-do app that comes with Office 365. It’s used for personal and teamwork planning, with a simple card-based interface that’s similar to Trello. Guidance on how to use Planner within Teams can be found here: https://support.office.com/en-us/article/use-planner-in-microsoft-teams-62798a9f-e8f7-4722-a700-27dd28a06ee0
Data
An excel document can be added to a tab to allow team members to view, edit and annotate the document at the same time. The excel document should be uploaded using the Files tab and select Upload.
Once you share a file, you can also share a link to it. That way, you don't ever have to upload multiple copies of the same file to share it in different places.
Websites
Adding a tab in Teams
- Within the Teams application, click on the Teams tab on the left hand menu bar.
- Then select the channel you wish to use:
3. Click the plus symbol to Add a tab .
4. From there, select the app or file you want. In some cases, you might go on to add a specific file to the tab.
Please note that Excel, PowerPoint, Word, and PDF files must be uploaded to the Files tab before they can be converted to other tabs.
5. So for example you might decide to add a website tab. Click the "Website" button
To find this button more easily, you can filter this list by typing "Website" in the "Search" textbox.
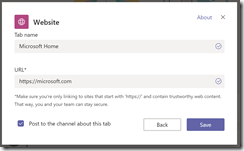
6. The "Website" dialog displays, as shown below:
At the "Tab name" field, enter a name to display in the tab list, identifying this tab.
At the URL field, enter a URL accessible by team members. This can be external or internal; but it must be an SSL site, so it must begin with "https://".
If you check the "Post to the channel about this tab", a message will be added to the "Conversations" tab with a link to the new tab.


