Self Service Group Administrators and Approvers
- Jennifer Allan
- Elaine Keogh
- Jordi Sol
Introduction
Self Service Group Administrators is a role within the Ivanti Service Manager (ISM) system that has some higher level of permission. However, the basic functionality of the Self Service Portal is still there so you can refer to this guide for the basic information - User Guide - Self Service Portal.
Please note that our intent is that this portal give you all of the information about your group's employees and configuration items. What you see in the portal may not 100% represent what will be on your monthly bill however it should provide much useful information to facilitate better management of the CSCS services you subscribe to.
What is a Group?
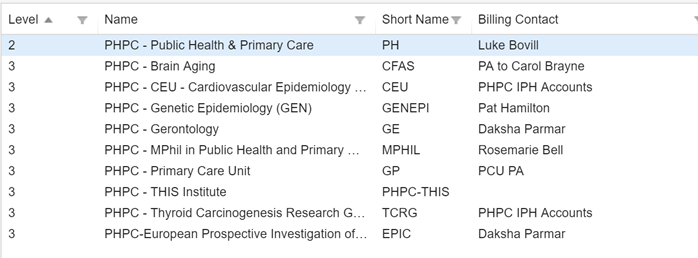
We have set the ISM system up with a hierarchy of departments, groups, institutions, institutes, etc. They largely sit under the appropriate school (e.g. Clinical Medicine or Biological Sciences) and then flow down in a hierarchy. For example, PHPC - Public Health and Primary care is a level 2 group with several departments under it.
Each group has a Billing Contact and this is the person to whom the billing reports get sent. The actual CUFS invoices are sent to whomever is set as a receivable contact in the CUFS system.
Approvers:
Each group also has what we’ve decided to call Approvers. Approvers and Billing Contacts will all be able to see the Employees and Configuration Items being billed to a group (note that the software calls all the people in it Employees regardless of their status and computers and printers are called Configuration Items). If you are in a parent billing group like PHPC, you’ll see all the items in the groups beneath it in the hierarchy. In the screenshot below I’m logged in as a Billing Contact in PHPC and this is what I see for PHPC. If you are in a child group, you only see the items in that group.
Logging in and changing role
Go to https://itsupport.medschl.cam.ac.uk and log in using your CSCS account. You can click the link that says Log in with Raven and you will be taken to a Raven login screen then passed back to the portal.
Change your role to Self Service Group Admin. On the right side of the screen at the top of the window find your name. Under it you will see what role you are currently logged in as. If it says Self Service User put your mouse beside the role name and a little arrow will show up (the finger is pointing to it in the screenshot below) and you can then click on it and choose Self Service Group Admin. This will switch you to that role and show you the additional menu options you need.

Menu Items for Self Service Group Admins and Approvers
Home
Service Catalog
My History
Configuration Items
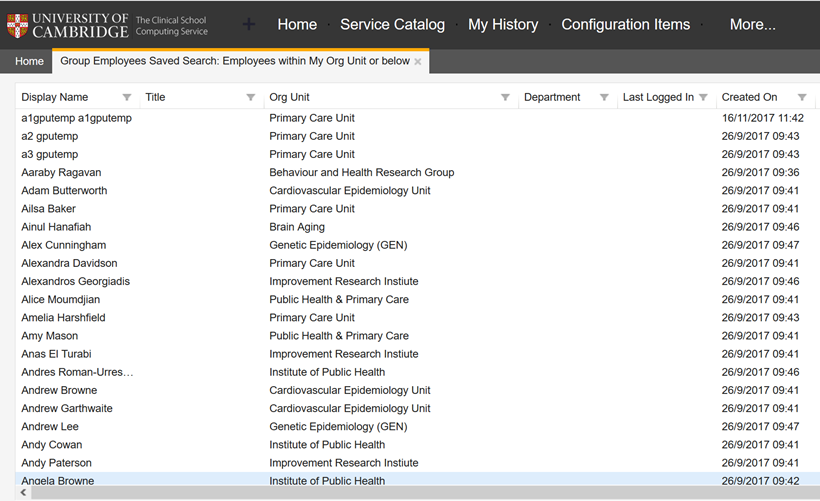
Group Employees
Knowledge Centre
Alert
Announcements
Searching
Unfortunately there is no searching ability to find CI or Employees in the lists. This is a product limitation.
Configuration Items
A configuration item is a piece of IT hardware that CSCS knows about that relates to your group. This includes computers, servers, printers, phones, SDHS studies, shared mailboxes, etc.
For convenience, you can see a list of all of these items. However, please note that because of the complexity of the different groups and institutions and how the billing is set up, there may be instances when you cannot see a few items. If that is the case, please contact the Service Desk and have them investigate. In some instances we will not be able to fix this. For example if a device was charged to more than one group, only one can be the 'owner' in the system and thus be able to see it. If that is not the group you are a member of, you'll not be able to see the device.
Whilst you can see details of CIs from looking at an Employee, we recommend that you only use the Configuration Items workspace instead. There are some errors in this area that we were unable to resolve prior to go-live.

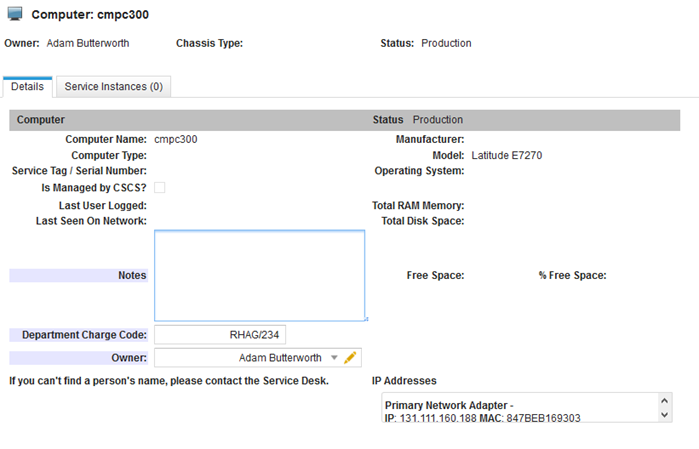
Green highlighting means that there are CSCS services attached to the device
When I open up the record for a computer, this is what you see. You can edit the notes, Department Charge Code and the Owner field. The owner field and the text you put in the charge code field will then show up on the billing report that you get each month like it does currently.
Changing ownership of a CI
You can change the Owner field. The Owner is the person who uses the item and can be chosen from a list of anyone who is in the same group as you.
To change the owner type the name of the new name in the Owner field. If you can't find the name there is an advanced search. Click on the magnifying glass beside the Owner name and a Find Employee window will appear.
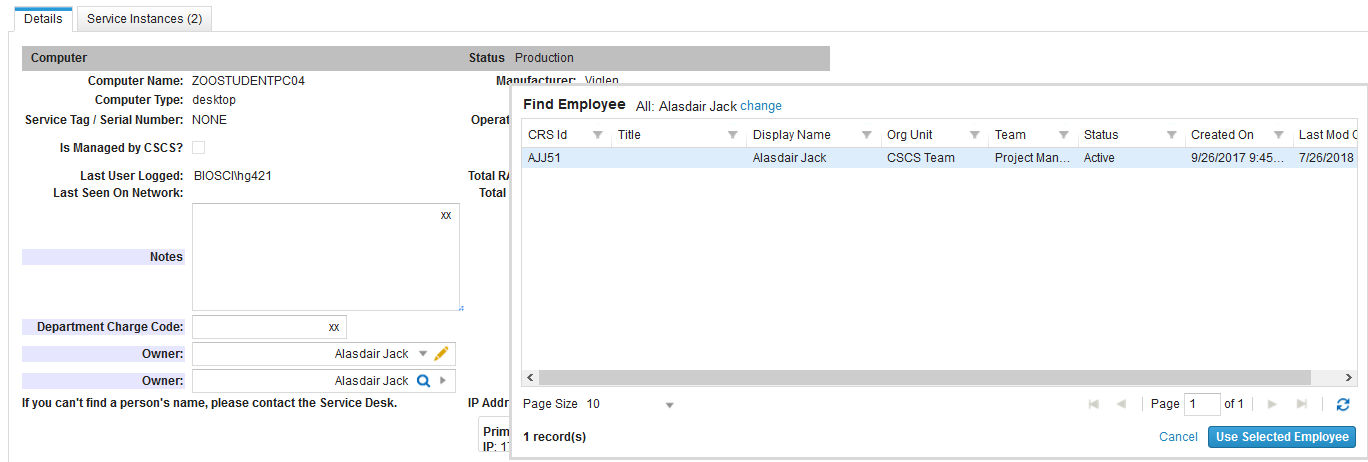
Click on the change link beside the name and use the find dialogue box to find the person using any of the criteria (first name, last name, LoginID (CRSID) or Email) and click the Search button. if you just delete the name and leave all the fields blank and click search, you'll see all the people you can choose from.
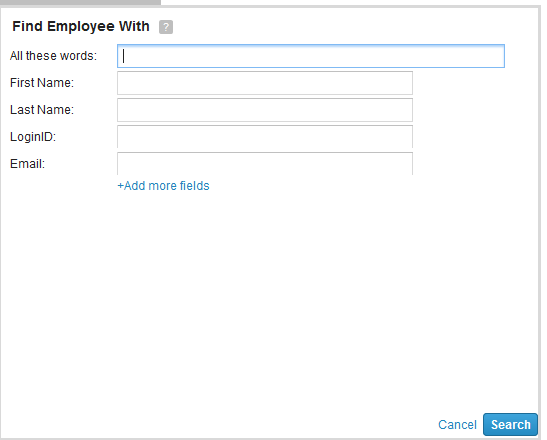
Click on the name you want to choose and click the Use Selected Employee button to add it. If you need to change the name to someone who does not appear in the list of names you can choose from, please log a Generic Service Request so that the service desk can investigate.
Searching
If you need to find an item in a large list, use grouping or filters to help narrow it down. Each column on the list has a little funnel symbol beside it. This means that you can filter and group by that column.

Grouping will show you the items in the list grouped by the column you choose. For example, if you group by CI Type you see a list like this:
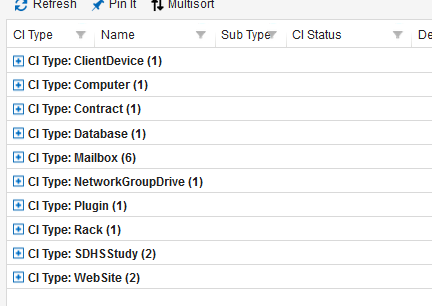
Grouping
To group: click the funnel in the column (e.g. CI Type). In the menu that appears click on Group By This Field.
To ungroup: click the funnel in the column (e.g. CI Type). In the menu that appears click on Group By This Field again to deselect it.
You can use the filter function to filter down the list. For example if you are faced with a list of hundreds of computers, you could filter it by owner or part of the name to find a smaller set of options.
Search by Filtering
To filter by part of the name:
In this example, we'll search called cmpr01
Click the funnel in the Name column. In the menu that appears click on Filters. In the text box that appears beside Filters, type part of the name (e.g. 01)
You will get a list of all items with 01 in the name. You could also search for the entire name cmpr01 and only see the single item when it is found
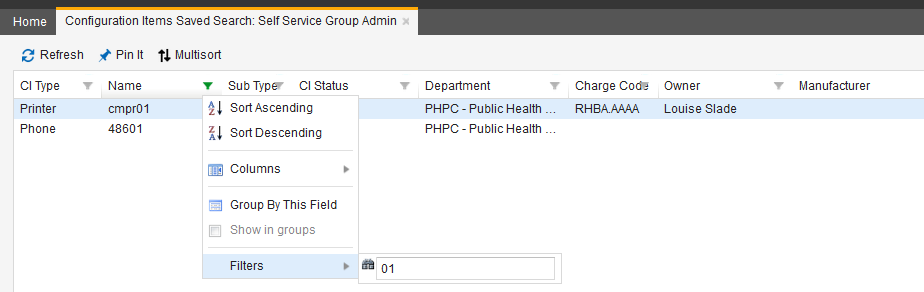
When a list is filtered, you'll notice that the funnel is green. To turn off the filter,
Click the funnel that is green and delete the text in the filters box (beside the icon of a pair of binoculars)
You can also filter the list to see the CIs that doesn't have assigned a Charge Code by clicking on the Show Filters link and then selecting the No Charge Code option.
Employees
You should only see people who are active when viewing this list. If someone has left your department, you should have CSCS change the status to disabled or terminated and the will no longer show up in this list.

You can filter the list to see the Employees that doesn't have assigned a Charge Code by clicking on the Show Filters link and then selecting the No Charge Code option.
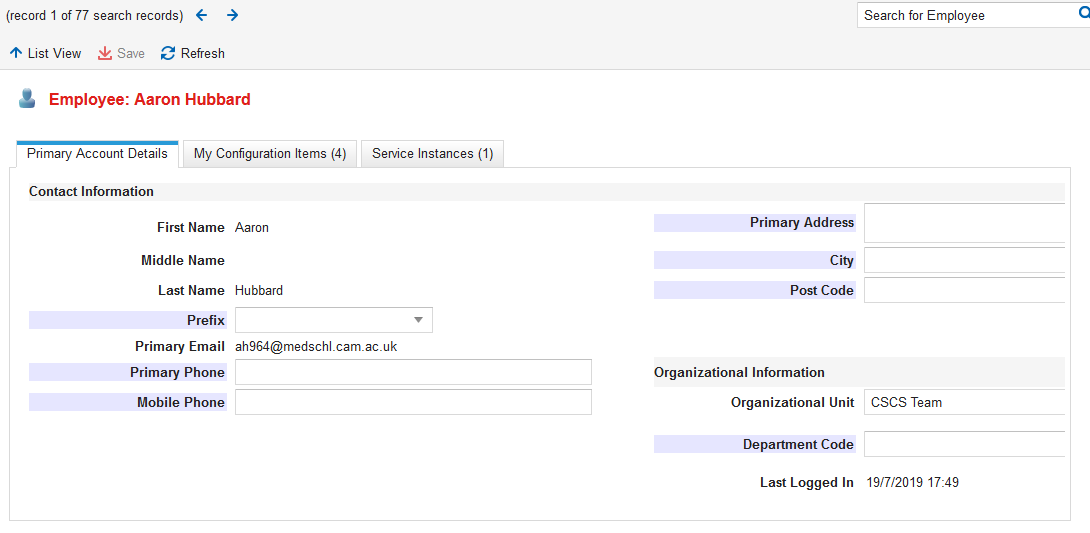
When you look an employee record, you will see this screen. Here you can edit the phone numbers, address, and department code. At some point we’ll be pulling in the primary phone numbers from the University phone system but for now, we’ll put in the data that we do have here. You can also see that each person also has a tab showing the Configurations related to him or her. In Aaron’s case (using that Owner field above), he has 4 items.
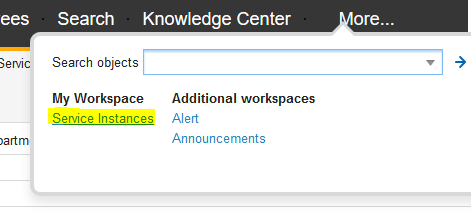
Service Instances
CSCS charges are recorded in this tool via Service Instances. You can have a service instance on an employee or a CI. This information will appear in the tab called Service Instance when you are looking at an Employee or a CI object. You could also see all your group's service instances by clicking on the More... link and selecting the Service Instance workspace:
When you go to look at a service instance, you'll see this screen. This links a service with an employee to an organisation unit. in the example below it's showing a Network Connection service for itpr06 for Alasdair Jack of the CSCS Team.
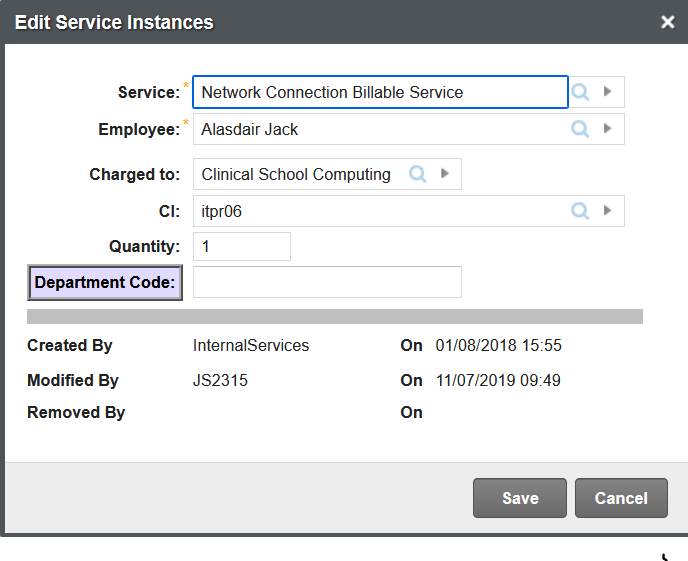
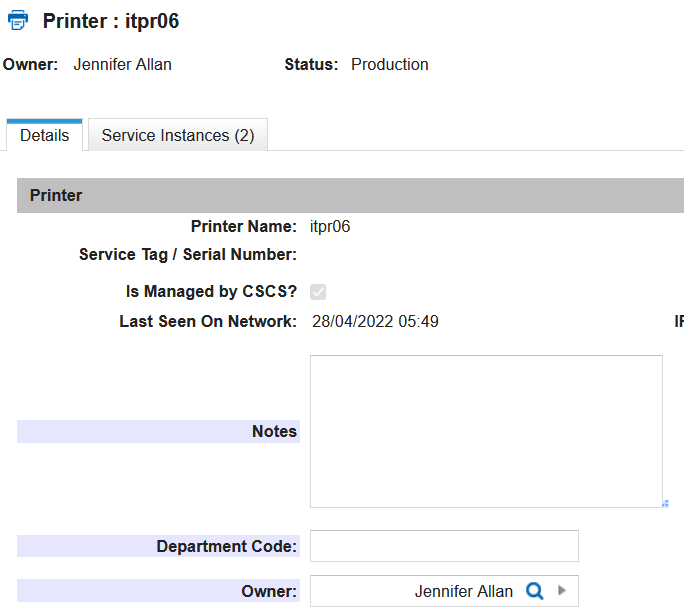
This is not necessarily the same information you'll see when you look at the Details screen. Below you can see that it shows that the Owner is Jennifer Allan.
Your monthly billing report will show the information from the Service Instance and not the Details tab. This allows the system to be flexible enough to accommodate for different groups' ownership and billing requirements.