/
Move OneNote Notebook to a New Microsoft Subscription
Move OneNote Notebook to a New Microsoft Subscription
- Jennifer Allan
Owned by Jennifer Allan
Jan 12, 2021
Analytics
Loading data...
Introduction
You may need to move a OneNote notebook from one Microsoft tenancy to another. For example from an @slcu.cam.ac.uk account to @cam or from a work to a personal Microsoft subscription.
Requirements
OneNote from Office 2016 or 2019 or Office 365 should be installed on your computer.
Instructions
- Open up your OneNote notbook in the OneNote application on your computer and make sure that all the changes have synchronised.
- Go to File, and on the Info tab click the View Sync Status button
- A window will pop up and in the right indicate if any are not up to date. You can click the Sync Now button to force it to sync
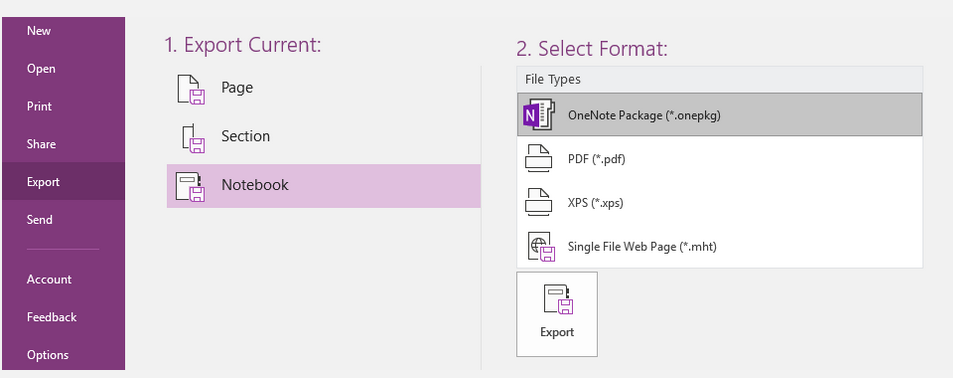
- Click File Export > Notebook > OneNote Package and export the notebook. Name your file something meaningful and save it on to your local disk (e.g. c:\temp)
- Close your notebook by clicking File then choose the notebook and click the little arrow under Settings > Close
- Sign out of your first Microsoft account
- In OneNote click on your name at the top right of the window. When you do, a window will pop up an option to Switch Account. Click on that
- Sign in to your other account - most often it will be your @cam account for which you use your Raven CRSid and password.
- Close the OneNote application
- Find the file you saved in step 2 and double click on it
- This should open that file up in OneNote.
- You will be prompted to give the notebook a name and where to save it. Name it as you wish and save it to your @cam OneDrive folder
- Click File > Share > type the name of the notebook you used in step 7 > Move Notebook.
- Start syncing the file by repeating step 1 a and b
, multiple selections available,
Related content
OneDrive - Set up and Copying your data to OneDrive
OneDrive - Set up and Copying your data to OneDrive
More like this
Raven Password Changed - OneDrive
Raven Password Changed - OneDrive
More like this
How to move data from Druva to UIS OneDrive
How to move data from Druva to UIS OneDrive
More like this
How to move your files/data to UIS OneDrive
How to move your files/data to UIS OneDrive
More like this